What's inside
As an Amazon Associate I earn from qualifying purchases. This post may contain affiliate links at no extra cost to you.
For a stained picture ledge, choose wood with a smooth face, predictable grain and enough thickness to resist sagging. Poplar is easy to work but stains blotchy; pine is inexpensive but can dent and show uneven color. For a ledge where the grain should look good under stain, red oak is usually the practical choice. Hard maple gives a cleaner, quieter look, but it takes stain less predictably.
As an Amazon Associate we earn from qualifying purchases at no extra cost to you.


Our Top Picks
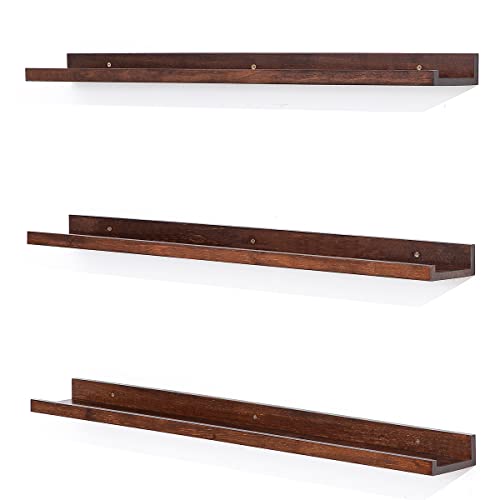 MBYD 36 Inch Wood Floating Shelves Wall MountedSet of 3 36 in36 x 4.5 x 2 inches5.73 poundsCheck on Amazon
 1/2 pt Minwax 13407 Clear Pre-Stain Wood Conditioner1/2 Pint3 x 3.25 x 3 inches0 PoundsCheck on Amazon


Choose wood for the finish you want
A clear or lightly tinted finish shows the wood itself, so species matters. Oak has open, prominent grain; maple has fine, subtle grain; pine has knots and pronounced earlywood bands. A dark stain does not make these woods look alike. It tends to emphasize oak’s pores and can make pine’s soft bands look especially uneven.
For a typical shelf about 3½ inches deep and ¾ inch thick, straight, clear boards are easier to finish than knotty or figured stock. Inspect the actual board in good light: avoid large knots, end checks and grain that wanders across the face. If possible, buy a little extra material for stain samples.
Wood choices at a glance
| Wood | Appearance after stain | Workability and drawbacks | Best fit |
|---|---|---|---|
| Red oak | Strong, open grain; stain usually takes evenly | Easy to find and machine; pores remain visible, and splinters can form at edges | Traditional grain and medium-to-dark stains |
| Hard maple | Fine, restrained grain; can look pale or blotchy with dark stain | Hard to dent, but harder to sand and stain evenly | Light stains or a clean, understated look |
| Cherry | Fine grain that deepens naturally with age | Costs more; dark stain can hide its natural color | Warm, clear or lightly stained finishes |
| Pine | Visible knots and bands; stain can vary sharply | Cheap and easy to cut, but dents readily and may blotch | Budget ledges, especially with a light finish |
| Poplar | Plain grain; green or brown streaks may show through | Inexpensive and easy to shape, but not a reliable choice for a rich stained appearance | Painted ledges or hidden structural parts |
Best all-around choice: red oak
For most stained ledges, straight-grained red oak is a good balance of availability, price and stain response. It suits medium and dark browns, and its grain gives a simple shelf some visual character. Choose it if you want the ledge to read as wood rather than as a uniformly colored strip.
Oak’s open pores are a trade-off, not a defect. A standard stain-and-topcoat finish leaves the texture visible. If you want a glass-smooth surface, you may need grain filler before the finish, which adds work and can change the look. Sand sharp edges lightly; overly rounded edges can absorb more stain and turn darker than the broad face.
When another species makes more sense
Choose hard maple when a fine-grained, pale ledge fits the room. Use a light stain or test a sample before committing to a dark shade: maple can develop cloudy patches, especially if the surface is sanded unevenly. A thin coat of a suitable pre-stain conditioner may help, but it does not guarantee uniform color. Follow the conditioner’s label and test the complete finish schedule on scrap.
Pine is a reasonable way to keep costs down, particularly for a lightly stained ledge in a casual room. Its soft growth rings can absorb stain at different rates, and knots may darken or bleed resin. Sand carefully and use a conditioner when the stain manufacturer recommends it. If a perfectly even, dark brown finish is the priority, buying a better-grade oak board is often less frustrating than trying to make knotty pine look uniform.
Poplar is usually a better paint-grade choice. It is inexpensive and stable enough for many indoor ledges, but its greenish or brown streaks can remain visible under transparent stain. Cherry costs more, but can look excellent with a clear finish or a light stain; a dark color often wastes its natural warmth.
Prepare the surface before staining
Sand the board flat and evenly, working through grits rather than skipping straight to fine paper. For many hardwoods, a sequence such as 120, 150 and 180 grit is a useful starting point; for soft pine, finish at 150 or 180 unless the stain instructions call for something else. Very fine sanding can burnish the surface and reduce stain absorption. Remove dust between grits and before finishing, and ease the front corners just enough that they do not feel sharp.
Do not judge color from the stain can. Test on an offcut from the same board, sanded to the same grit, then apply the intended stain and topcoat. Stain color changes with the wood, the number of coats and the finish over it. If the sample looks too dark, wipe off excess promptly or select a lighter stain rather than assuming an extra coat will improve it.
For a simple oil-based stain, wipe on a thin coat and remove excess according to the label. Pooled stain can dry tacky or unevenly, especially in corners and along end grain. Let it dry fully before applying a compatible clear finish. A water-based topcoat can raise the grain slightly; a light scuff sand after the first coat, once dry, helps smooth it. Keep sanding pressure gentle so you do not cut through the finish on edges.
Useful supplies include wood stain sample products and pre-stain wood conditioner. Neither replaces a test on the actual stock.
Buy for the ledge, not just the color
Check that the board is straight and dry, and choose a thickness and mounting method suited to the load. A ¾-inch board is common for a short picture ledge, but a long, deep shelf can sag; add support rather than relying on a thicker finish to solve a structural problem. Locate wall studs where possible, and do not treat a decorative ledge as a heavy-duty shelf unless its brackets and anchors are rated for that use.
For most buyers, the decision is straightforward: red oak for a dependable stained grain, maple for a quieter light finish, and pine when low cost matters more than perfect color uniformity. Buy a straight board, test the stain on scrap and let each coat dry fully. Those steps prevent more visible failures than choosing an expensive wood and rushing the finish.

0 Comments