

What's inside
- Does Sanding Wood Add Woodgrain?
- How to Raise the Grain With Water: The Short Version
- Why Raising Grain Matters
- Staining Schedule: When to Raise the Grain
- When You Need to Do It (And When You Can Skip)
- Raise the Grain With Water: Which Method Works Best?
- What You Need
- Step-by-Step: Raise and Sand Grain Correctly
- How Long to Sand After Raising the Grain
- Raise the Grain on Maple With Water-Based Stain
- How to Bring Out Cottonwood Grain Through Staining
- Raising Wood Grain After Sanding for Staining: Species Cheat Sheet
- Grit Strategy and Common Mistakes
- Choosing a Water-Based Stain After You Raise the Grain
- Troubleshooting Rough or Blotchy Results
- Quick Checklist Before You Stain
- Frequently Asked Questions About Raising Wood Grain
- Related Guides
- Does Sanding Wood Add Woodgrain?
- How to Raise the Grain With Water: The Short Version
- Why Raising Grain Matters
- Staining Schedule: When to Raise the Grain
- When You Need to Do It (And When You Can Skip)
- Raise the Grain With Water: Which Method Works Best?
- What You Need
- Step-by-Step: Raise and Sand Grain Correctly
- How Long to Sand After Raising the Grain
- Raise the Grain on Maple With Water-Based Stain
- How to Bring Out Cottonwood Grain Through Staining
- Raising Wood Grain After Sanding for Staining: Species Cheat Sheet
- Grit Strategy and Common Mistakes
- Choosing a Water-Based Stain After You Raise the Grain
- Troubleshooting Rough or Blotchy Results
- Quick Checklist Before You Stain
- Frequently Asked Questions About Raising Wood Grain
- Related Guides
As an Amazon Associate I earn from qualifying purchases. This post may contain affiliate links at no extra cost to you.
Raising the grain before staining is the extra step that separates a blotchy, rough finish from a smooth, even one. When water-based stain, dye, or topcoat hits raw wood, it swells loose wood fibers that were crushed flat during sanding. Those fibers stand up, dry hard, and leave the surface feeling like sandpaper — even if it felt perfectly smooth before you started. Pre-raising the grain on purpose, then sanding it back, removes those fibers in a controlled way so your actual stain goes on clean.
If you are using an oil-based stain on a closed-grain wood like maple or cherry, you can often skip this. If you are using any water-based product on any wood — especially open-grain species like oak, ash, or walnut — you should not skip it. It takes 30-45 minutes plus drying time and prevents the most common complaint with water-based finishes: roughness after the first coat.
As an Amazon Associate we earn from qualifying purchases at no extra cost to you.

Updated October 2026 — Raising grain for better stain retention takes three moves: wet the sanded wood with water, let it dry completely, then sand off the lifted fibers with your final grit. Do it before any water-based stain, dye or topcoat so the first coat goes on smooth and even.
Our Top Picks
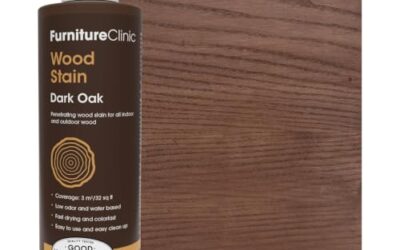
 Varathane Dark Walnut Wood Stain1 Quart (Pack of 1)4.25 x 4.25 x 4.9 inches2.4 poundsCheck on Amazon


Does Sanding Wood Add Woodgrain?
No. Sanding does not add woodgrain. The grain pattern comes from the tree’s growth rings and cannot be created by sanding. What sanding does is compress and cut fibers, which can make the surface look smoother than it really is. When moisture arrives, the crushed fibers swell and stand up. That is the rough, fuzzy feel people call “raised grain.”
Two things are often confused here:
- Raised grain: fibers that stand up after wetting. You sand them off before staining.
- Grain pattern or figure: the visible rings and pores. Stain makes these more or less obvious, but sanding does not create them.
How to Raise the Grain With Water: The Short Version
- Sand to 180 or 220 grit and remove the dust.
- Wipe or mist the whole surface with water, wet but not puddled.
- Let it dry fully, from 45 minutes in warm dry air to overnight in a cool shop.
- Sand lightly with the same grit, going with the grain.
- Vacuum, wipe, then stain.
The rest of this guide explains each step, how it changes with species such as maple and cottonwood, and how to plan the schedule.
Why Raising Grain Matters
Sanding cuts and compresses wood fibers. Under a microscope, many fibers are not cleanly cut but bent over and pressed down. Dry, they feel smooth. Add water and they absorb moisture, swell, and spring upright. This is called grain raise.
When you apply a water-based wood stain directly to freshly sanded wood, two things happen at once: the wood absorbs pigment unevenly where fibers have swelled, and the surface dries rough. You then have to sand the stained surface to smooth it, which risks cutting through color and creating light spots. Pre-raising solves both problems by making the swelling happen before any color is applied.
Oil-based stains and solvent-based polyurethanes cause very little grain raise because they contain little to no water. That is why old-school finishing schedules often omit this step. The trade-off is longer dry times and stronger fumes. With modern water-based stains and finishes — which dry faster and are lower-odor — grain raising is almost mandatory for a professional result.
Staining Schedule: When to Raise the Grain
If you wonder where this step fits, here is a simple staining schedule. Times assume about 70F and moderate humidity. Cold or damp shops need longer.
| Step | What you do | Typical time |
|---|---|---|
| 1 | Sand through your grits to the final grit (180 to 220) | Depends on the piece |
| 2 | Remove dust (vacuum, then a clean cloth) | 10 minutes |
| 3 | Raise the grain with water | 5 to 10 minutes |
| 4 | Let the wood dry fully | 45 minutes to overnight |
| 5 | Sand lightly with the same grit | 10 to 20 minutes |
| 6 | Remove dust again | 10 minutes |
| 7 | Apply conditioner if needed, then stain | Stain within about a day |
| 8 | Let the stain dry, then apply the first coat of topcoat | Per product label |
Raising grain before stain versus before topcoat
Raise the grain before the stain when the stain is water-based, because the stain will lift fibers itself. For a water-based topcoat over an oil-based stain, you can also let the first coat of finish do the raising: apply it, let it dry, sand the fuzz smooth lightly, and keep going. This is sometimes called burying the grain. Sand lightly so you do not cut through color.
How many times should you raise the grain?
- One cycle is enough for most stain jobs.
- Two light cycles are common before water-based topcoats on table tops and doors.
- Soft or fuzzy woods may need a second cycle even for stain.
When You Need to Do It (And When You Can Skip)
Not every project needs grain raising. Use this rule:
| Wood / Product Combination | Raise Grain First? | Why |
|---|---|---|
| Water-based stain or dye on any species | Yes, always | Water will raise grain aggressively; pre-raising prevents rough, blotchy color |
| Water-based topcoat (poly, lacquer, polyurethane) over raw wood | Yes | First coat will raise grain and feel rough; better to raise and sand before coating |
| Oil-based stain or oil-based poly on oak, ash, walnut | Optional | Minimal water content, but light misting still improves final smoothness |
| Oil-based stain on maple, cherry, birch, pine | No | Risk of over-wetting soft/blotchy woods; focus on conditioner instead |
| Already sealed wood, MDF, or prefinished plywood | No | No raw fibers to raise; sanding will only damage the existing seal |
If you are unsure what your stain base is, check the cleanup instructions. Soap and water cleanup means water-based. Mineral spirits cleanup means oil-based.
Raise the Grain With Water: Which Method Works Best?
Several methods raise grain. They all do the same thing, so pick the one that suits the size of the piece.
| Method | Best for | Watch out for |
|---|---|---|
| Fine mist spray bottle | Large flat panels, tabletops | Uneven misting leaves dry patches |
| Damp (not dripping) cloth | Small parts, trim, turned pieces | Too much water swells joints and veneer |
| Sponge | Medium panels | Streaks if the sponge is dirty |
Distilled water or tap water?
Distilled water is the safe choice because it carries no minerals that can show under a light stain. Tap water works for most projects, but use distilled on pale woods and light stains.
A tip on dust cloths before water-based stain
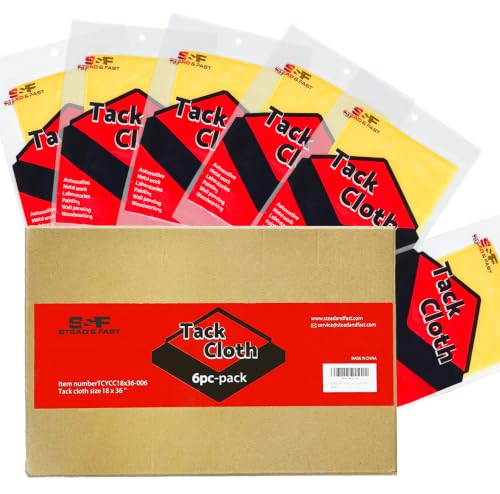
Some finishing guides warn that oil-based tack rags can leave a residue that repels water-based stain. If you use a tack cloth, choose a wax-free, silicone-free type, press very lightly, or finish the dust removal with a clean, dry microfiber cloth.
S&F Stead & Fast Tack Cloth — Best for wax-free dust removal

- Pack of 6 cloths
- Roughly 18 x 36 inches
- Wax and silicone free
- Anti-static cotton
Pros: wax-free for finishing work, large cloth size, low cost per piece. Cons: still leaves a trace if you press hard. Skip it if you already vacuum and wipe with a dry microfiber cloth.
What You Need
You do not need specialty products. Distilled water works better than tap water because it leaves no mineral deposits that can show under light stains. You need a way to apply a fine, even mist, a way to sand it back without gouging, and a way to remove dust completely.
A simple fine mist spray bottle from the cleaning aisle is ideal — you want fog, not droplets. For sanding, use fresh aluminum oxide sandpaper and a flat sanding block for woodworking on flat surfaces. A block keeps you from pressing the paper into soft earlywood and creating waves. For dust removal, a vacuum followed by a tack cloth is more reliable than blowing with compressed air, which just moves dust around the shop.
Step-by-Step: Raise and Sand Grain Correctly
Start from your final sanded surface. For most staining projects that means you have already sanded progressively to 180-grit or 220-grit and removed all dust. Do not jump to raising grain from 120-grit — you will lock in deep scratches.
1. Mist, don’t soak. Hold the spray bottle 8-12 inches from the surface and apply one light, even fog coat. The wood should look damp, not wet. You should not see puddles or dark water spots that take more than a few minutes to fade. On large tabletops, work in sections no larger than 2×3 feet to keep coverage even. A common failure mode is soaking end grain — it absorbs water much faster than face grain and will swell and crack if flooded. Go lighter on end grain.
2. Let it dry completely. At 70F and 45% humidity, a light mist dries in 45-60 minutes. In a cold or damp shop, give it 2 hours. The wood must return to its original light color and feel dry to the touch. Sanding damp wood tears fibers instead of cutting them and will clog your paper instantly. Do not rush this with a heat gun or by placing it in direct sun — uneven drying can warp thin panels.
3. Sand the whiskers off. After drying, the surface will feel distinctly rough and prickly. That is the raised grain. Sand it smooth with the same grit you finished with (180 or 220), or one step finer (220 if you finished at 180). Use light, even pressure — let the paper do the work. Two to three passes with the grain is usually enough. You are not trying to remove wood, just clipping off the raised fiber tips. If you sand aggressively here you will cut through to fresh, un-raised fibers and defeat the purpose.
4. Remove all dust. Vacuum with a soft brush attachment, then wipe with a tack cloth using almost no pressure. Follow with a dry microfiber wipe. Any dust left behind will get trapped under stain and read as dark specks, especially under natural or light stains.
5. Stain within 24 hours. Raised and re-sanded wood will slowly re-absorb humidity from the air. If you wait several days in a humid shop, some grain will re-raise. If you have to wait longer than a day, do a final dry wipe with 220-grit before staining.
For ultra-smooth film finishes where you will apply water-based polyurethane, some finishers repeat the process twice: raise-sand-raise-sand. The second cycle catches fibers that were too short to raise the first time. It is worth it on table tops and doors that will get close inspection. For vertical trim or hidden parts, once is enough.
How Long to Sand After Raising the Grain
You do not need to sand long. Two to three light passes with the grain, using the same grit or one step finer, clip off the raised fibers. On a typical tabletop, plan on 10 to 20 minutes. If you are still sanding hard after that, the pressure is too heavy or the paper is worn.
- Paper: use fresh 180 to 220 grit paper. Dull paper tears fibers instead of cutting them.
- Pressure: let the paper do the work. You only need to remove the fuzz.
- Finish with a feel check: run your palm along the grain. It should feel as smooth as it did before wetting.
Raise the Grain on Maple With Water-Based Stain
Maple is dense and closed-grain, so it raises less than oak. It is also prone to blotching with stain. For maple and a water-based stain:
- Sand to 180 grit, not finer, so the stain can still penetrate.
- Raise the grain once with a light mist and let it dry.
- Sand lightly with 180 grit.
- Apply a water-based pre-stain conditioner before the stain.
- Apply the stain in thin, even coats.
Minwax Water-Based Pre-Stain Wood Conditioner — Best for blotch-prone maple

- Water-based formula
- Clear, 1 quart size
- Designed for use before staining
Pros: helps even out absorption on blotchy woods, pairs with water-based stains. Cons: adds a step and drying time. Skip it if you are staining an open-grain wood like oak.
How to Bring Out Cottonwood Grain Through Staining
Cottonwood is a soft, low-density hardwood. It tends to fuzz easily, so raising the grain matters more than on denser woods. Staining also tends to look uneven on it.
- Sand to 150 or 180 grit and do not over-sand, since soft wood burnishes.
- Raise the grain, sand lightly, and repeat once if the surface still feels fuzzy.
- Use a conditioner or a thin coat of sealer to reduce blotching.
- Choose a gel or darker stain if you want to emphasize the grain lines.
- Test on a scrap piece first, because cottonwood can take stain very differently from board to board.
Raising Wood Grain After Sanding for Staining: Species Cheat Sheet
| Wood | Final grit | Raise grain? | Note |
|---|---|---|---|
| Oak, ash, walnut | 180 to 220 | Yes, with water-based products | Open pores, grain lifts easily |
| Maple, cherry, birch | 180 | Yes, once, lightly | Use conditioner to avoid blotching |
| Pine, poplar | 150 to 180 | Yes | Soft, fuzzes easily |
| Cottonwood | 150 to 180 | Yes, possibly twice | Soft and uneven; test first |
Grit Strategy and Common Mistakes
Your final grit before raising grain matters more than the raising step itself. Sanding too fine (320+ grit) before staining burnishes the surface and prevents stain from penetrating evenly — you will get a pale, uneven color that looks washed out. Sanding too coarse (120-150 grit) leaves scratches that the stain will highlight as dark lines.
For most hardwoods before staining: 120 -> 150 -> 180. For softwoods like pine or poplar: stop at 150 or 180 max. For hard maple and cherry that blotch easily, stop at 180 and use a pre-stain conditioner instead of fine sanding.
Three mistakes that ruin an otherwise good job:
Over-wetting: Using a soaked rag instead of a mist, or pouring water on the board. This swells the wood unevenly, raises the grain too aggressively, and can cause veneer to bubble or joints to swell. If you see water beading or pooling, you have applied far too much. Wipe off the excess immediately and let dry longer.
Sanding through grits after raising: Do not go back to 120-grit to knock down raised grain. You will re-introduce coarse scratches that will not be removed by the final stain. Stay at your finish grit.
Skipping dust removal: Tack cloths are cheap and essential. A budget pack prevents specks that would force you to re-sand after staining. Pressing hard with a tack cloth can transfer waxy residue — use light, gliding pressure and replace the cloth when it no longer picks up dust.
When done correctly, water-raised wood should feel as smooth dry as it did before wetting, but it will stay smooth after your first coat of water-based stain or finish. That one extra hour of work saves you from sanding out color, re-staining blotches, or living with a rough surface that catches dust for the life of the piece.
Choosing a Water-Based Stain After You Raise the Grain
If you do the raising step, you can use a water-based stain with confidence. Water-based stains dry fast and clean up with soap and water, but they lift grain the most, which is why the prep step pays off.
General Finishes Water Based Wood Stain — Best for a dedicated water-based stain

- Water-based wood stain
- Sold in quart size
- Available in many colors, such as Espresso
- Soap and water cleanup
Pros: pairs with the raise-and-sand step, low odor, a wide color range. Cons: dries quickly, so work in small sections and keep a wet edge. Skip it if you prefer oil-based stain’s longer working time.
Water popping versus raising the grain
Water popping and raising the grain both use water, but they have different goals. Raising the grain is done before water-based finishes and is followed by sanding the fibers back. Water popping is used before some penetrating finishes to open the pores for deeper color, and you do not sand it smooth afterwards. Do not mix the two techniques on the same project.
Oil-based stain on a water-popped surface
If you plan to use an oil-based stain, you usually do not need to raise the grain at all. The existing guide above covers when to skip it.
Troubleshooting Rough or Blotchy Results
- Surface is still rough after the first coat: the grain re-raised. Sand lightly with 220 grit and recoat.
- Light spots after sanding the stain: you sanded through the color. Touch up the stain and keep sanding to a minimum.
- Dark specks: dust was trapped under the stain. Remove dust fully before each coat.
- End grain looks very dark: seal it first with a diluted shellac wash or a conditioner, or sand it one grit finer.
- Warped thin panels: too much water. Use a lighter mist and dry flat.
Quick Checklist Before You Stain
- Final grit reached and dust removed.
- Grain raised and fully dry.
- Fibers sanded off with fresh paper.
- Conditioner applied if the wood blotches.
- Test on a scrap piece from the same board.
Frequently Asked Questions About Raising Wood Grain
Why raise the grain before staining?
Raising the grain stops water-based stain from lifting fibers after it is applied. It lets you remove the fuzz first, so the stain goes on smooth and evenly.
Do I need to raise the grain with an oil-based stain?
Usually not. Oil-based stains contain very little water and raise little grain, so you can often skip the step on closed-grain woods like maple and cherry.
How long should I wait after wetting the wood?
Wait until the wood is completely dry, usually 45 minutes to 2 hours, or overnight in a cool or humid shop. Sanding damp wood tears the fibers.
What grit should I use after raising the grain?
Use the same grit you finished with, typically 180 or 220, or one grit finer. Do not go back to a coarse grit.
Can I use a damp rag instead of a spray bottle?
Yes. A well-wrung damp cloth works well on small pieces. Avoid dripping water, which can swell joints and veneer.
How soon should I stain after raising the grain?
Stain within about 24 hours. If you wait longer in a humid shop, give the surface a quick dry wipe with 220 grit before staining.
Does raising the grain make wood darker?
Not on its own once it is dry and sanded. It can slightly affect how the wood takes stain, which is why a scrap test is a good idea.
Related guides
More from Amazon
Programs that pair well with the guide above. Offers and eligibility are set by Amazon and may change.
A free business account with business pricing and bulk-buying tools for work, shop or home office.
Create a business accountFree shipping on eligible items, Prime Video and more. Eligible new members can start with a free trial.
Start a Prime free trialAudiobooks and podcasts to listen to on the go. Eligible new members can start with a free trial.
Try Audible freeAd-free music streaming. Eligible new subscribers can start with a free trial.
Try Music Unlimited freeAs an Amazon Associate we earn from qualifying purchases.


Write Your Review
No reviews yet. Be the first to share your experience!