What's inside
As an Amazon Associate I earn from qualifying purchases. This post may contain affiliate links at no extra cost to you.
Our Top Picks
 Varathane Water-Based Ultimate Satin PolyurethaneHalf Pint (Pack of 1)3 x 3 x 3 inches0.64 poundsCheck on Amazon


What makes a good jewelry-box wood
A clear finish shows the wood rather than covering it, so the best choice depends on the look you want, the size of the box, and how much finishing work you’re prepared to do. For a first box, choose a stable, fine-grained hardwood that sands cleanly and doesn’t need stain to look finished. Cherry, maple, and walnut are reliable choices; each has a different color and a few practical quirks.
For small parts such as dividers and tray sides, straight grain matters more than dramatic figure. Wild grain can tear out during planing or sanding, and sapwood or color variation may look uneven once finish deepens the wood. Buy boards in person if possible, or check the seller’s photos for consistent color, flat faces, and no cracks near the edges.
As an Amazon Associate we earn from qualifying purchases at no extra cost to you.


Compare the main options
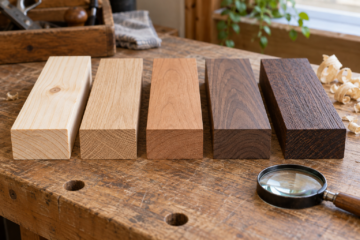
| Wood | Appearance under clear finish | Workability | Best fit |
|---|---|---|---|
| Cherry | Warm reddish brown; darkens with age and light exposure | Easy to machine and sand; can blotch under some finishes | A classic box with a warm, understated look |
| Hard maple | Pale cream to light tan; clean, subtle grain | Hard and durable, but can burn if a cutter lingers | A crisp, light-colored box |
| Walnut | Medium to dark brown with strong color contrast | Generally easy to work; softer than maple and can dent | A dark box that needs little or no stain |
| Beech | Light pinkish tan, with fine, even texture | Machines well, but moves with moisture changes | A budget-friendly light wood for a small box |
| Red oak | Prominent open grain; clear finish emphasizes pores | Widely available and sturdy; coarse texture takes extra prep | A lower-cost box where visible grain is welcome |
Cherry is often the easiest all-around recommendation. It’s usually simpler to finish evenly than maple, and its color grows richer over time. Walnut costs more in many markets, but its natural dark color means there’s little reason to stain it. Maple is a good choice when you want a pale, modern look, though a clear finish won’t make it white: it tends to warm slightly.
Buying lumber for a small box
Use solid hardwood for the visible sides, lid, and trim. A board around 3/4 inch thick is a convenient starting point; it can be planed to roughly 1/2 inch for a compact box. For fine work, buy more than the exact finished dimensions require. A 6-by-8-inch box may need only a small amount of wood, but defects, saw kerfs, and test cuts can consume the offcuts quickly.
Check that boards are flat and reasonably dry. If a board feels cool or damp, or its ends are checked, leave it behind. Wood movement still matters on a small project: keep the grain direction consistent when assembling a panel lid, and avoid trapping a solid-wood panel rigidly across its width. A plywood bottom, hidden in a groove, is often a sensible way to reduce movement and save money.
Cherry and walnut are worth buying from a hardwood dealer when you need a particular thickness or clean faces. If price is the priority, clear pine can work for a painted box, but its soft earlywood dents easily and its knots and resin can show through a clear finish. Beech or oak may be cheaper locally than walnut or cherry; the best deal depends on what your lumberyard stocks.
Sanding and joinery before finishing
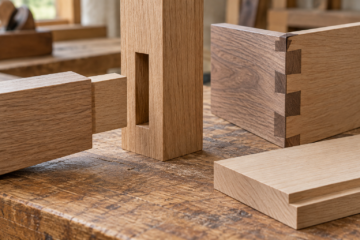
Make the joinery fit before sanding. A small gap at a miter or corner won’t disappear under clear finish; finish can make it more visible. For a simple box, tight miters reinforced with splines, or square corners joined with small dowels, are more dependable than trying to fill a poor fit with sawdust and glue.
Use a sharp blade or plane to get the surface as smooth as possible, then sand through a measured sequence such as 120, 150, and 180 grit. On a small jewelry box, sanding to 220 grit is usually enough. Going finer can reduce finish adhesion on some products and may burnish the surface unevenly. Remove dust between grits, and inspect the wood in angled light; cross-grain scratches are especially obvious under a clear coat.
Glue squeeze-out is a common failure point. Dried glue blocks finish from soaking into the wood, leaving pale spots or shiny patches. Use a small amount of glue, clamp only until the joint closes, and clean fresh squeeze-out with a damp cloth without flooding the joint. After the glue cures, scrape any remaining residue and sand the area evenly.
Choose and apply a clear finish
For an easy-to-repair finish, consider a water-based polyurethane. It stays relatively clear on pale woods and dries faster than many oil finishes, but brush marks and raised grain can be issues. Apply thin coats, follow the label’s recoat time, and lightly sand between coats if the product calls for it. A typical small box needs two or three coats, not a thick layer.
An oil-based finish adds amber warmth that suits cherry and walnut but can make maple look more yellow. For a low-build, natural feel, hard-wax oil is another option. It’s easy to refresh, though it offers less protection from standing water and abrasion than a film finish. Jewelry boxes usually see light use, but perfume, hand lotion, and metal items can still mark an unprotected surface.
Test the finish on an offcut from the same board. Apply the full sanding and finishing schedule, then check the color after it dries. A finish that looks clear in the can may deepen the wood noticeably. If you want to even out cherry or maple color, don’t reach for stain first: test a clear finish and a thin coat of dewaxed shellac on scrap. Stain can blotch or muddy the grain, and once applied it is difficult to remove cleanly.
Lining and final checks
Finish the inside as carefully as the outside, but avoid a heavy film where a liner must be glued. Let the finish cure according to its label before installing felt or velvet; “dry to touch” is not the same as fully cured. A thin, even finish helps prevent unfinished areas from absorbing moisture and looking patchy.
Before calling the box done, open and close the lid several times and check for rubbing. Finish adds thickness at edges, so ease sharp corners with a few light sanding strokes rather than rounding them heavily. For a first clear-finished box, cherry with a simple water-based finish is a forgiving balance of cost, appearance, and effort. Choose walnut for a naturally dark look, maple for a pale one, and buy the species that is straight, dry, and cleanest in your local stock.
0 Comments