What's inside
As an Amazon Associate I earn from qualifying purchases. This post may contain affiliate links at no extra cost to you.
Our Top Picks
 Sunhoo Bread Box for Kitchen Countertop Wooden BreadLarge14.4 x 9.6 x 13.5 Inches5.7 poundsCheck on Amazon
 Goozii Wood Bread Box for Kithcen Countertop1-Tier Large15.7 x 9.8 x 8.5 inches7.3 poundsCheck on Amazon
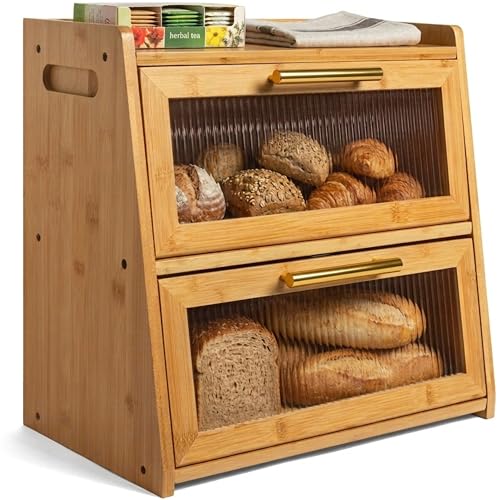 Gennua Kitchen Extra Large Bamboo Bread Box for15.75 inches15.75 x 9.84 x 16.4 Inches7 poundsCheck on Amazon
 Polyurethane Wood Finish Water Based Polyurethane Clear Gloss100 ml1.6 x 1.6 x 4.7 inchesCheck on Amazon

What matters in a bread box
A clear finish shows the wood, so species choice affects both appearance and how much work it takes to get a clean result. For a bread box, also consider weight, cost, glue-up difficulty, and whether the wood will move with seasonal humidity. The box does not need a food-contact finish on every surface: bread sits inside its own bag or wrapper, and a clear finish on the outside is mainly for appearance and easier wiping.
Choose straight, dry stock and avoid boards with pith, large knots, checks, or strong grain runout at corners and hinges. For solid-wood panels, allow for movement across the grain rather than gluing a wide panel rigidly into a frame. Plywood is a practical option for the sides and back, while solid wood can provide the more visible door, trim, or front panel.
As an Amazon Associate we earn from qualifying purchases at no extra cost to you.


Wood species compared
| Wood | Appearance under clear finish | Workability and cost | Best fit |
|---|---|---|---|
| Hard maple | Very pale, fine and even grain | Usually harder to sand evenly; can show glue marks | Clean, light-colored box |
| Cherry | Warm reddish-brown that darkens with age | Machines and finishes well; commonly costs more than poplar | Furniture-like appearance without stain |
| Walnut | Dark brown with prominent, varied grain | Generally easy to work; often the priciest choice here | Dark box or contrasting trim |
| Poplar | Pale cream with possible green or gray streaks | Inexpensive and easy to cut; soft and dents more easily | Budget build, especially when painted or used for hidden parts |
| Birch plywood | Light face veneer with subtle grain | Stable and convenient; edges need covering or careful finishing | Flat sides, back, and shelves |
The best choices for a clear finish
Cherry is the best all-around solid wood if you want a warm, refined box and are willing to pay more than you would for poplar. It sands and cuts cleanly, and a clear finish deepens its color without needing stain. Expect the wood to darken over time, especially where exposed to daylight; a door kept partly shaded may age differently from the rest of the box.
Hard maple is a good choice for a pale, simple look. Its tight grain gives a quiet surface, but sanding scratches and glue residue can stand out under clear finish. Use a sharp blade, spread glue carefully, and wipe squeeze-out before it dries without smearing it across the face. Maple can also look blotchy with some stains, so leave it natural unless you have tested the full finishing schedule on offcuts.
Walnut suits a darker design and usually needs no stain. Its color varies from board to board, so buy enough stock at once and arrange the pieces before cutting. It costs more, but using it only for the door or front trim over a birch-plywood carcass can control the bill without making the box look like a patchwork of mismatched woods.
Poplar is fine when price or paint matters more than grain. Under clear finish, its greenish or gray streaks can look uneven, and its softer surface picks up dents. It is a reasonable low-cost choice for internal dividers or less visible parts, but cherry, maple, or walnut usually make a more predictable-looking exposed face. For an economical carcass, consider birch plywood and add solid-wood edging to conceal the plies.
Buying and preparing the stock
For a small box, surfaced boards around 3/4 inch thick are a convenient starting point; plane them thinner only if the design calls for it. Check that boards lie flat and are not twisted. A moisture meter is useful if stock has been stored in a damp garage: indoor furniture stock is commonly around 6–9% moisture content, though the appropriate figure varies by region. Let wood acclimate in the room where the box will live, and do not build from visibly damp or freshly milled boards.
Before cutting parts, lay them out to choose grain direction and color. Make test cuts and test joints on scraps. For plywood, inspect the face veneer for patches and voids, and remember that a thin face can be sanded through surprisingly quickly. Edge banding or solid edging gives a cleaner appearance than trying to hide exposed plies with extra finish.
Sanding, glue, and surface preparation
Sand faces in sequence, typically 120, 150, and 180 grit; go to 220 only if the finish maker recommends it. Sanding too fine can reduce finish adhesion or leave a slick surface, while stopping at coarse grit leaves scratches visible after clear coat. Use a sanding block on edges and flat panels. Vacuum dust and wipe with a clean, dry cloth; avoid a tack cloth that leaves residue unless it is compatible with the finish.
Use interior-rated PVA wood glue for ordinary box joints and panel glue-ups. Apply a thin, even film, clamp until the joint closes without excessive pressure, and remove squeeze-out carefully. Dried glue blocks finish and often appears as pale, shiny patches; inspect the surface with raking light before finishing. If a joint will be exposed to repeated moisture or washing, redesign it rather than relying on glue alone: a bread box should be wiped, not soaked.
Choosing a clear finish
A water-based clear polyurethane keeps maple and birch relatively pale and dries quickly, but can raise grain slightly on the first coat. Oil-based polyurethane adds amber warmth, which flatters cherry and walnut but may yellow a pale species. Wiping varnish is easier to apply on small parts with fewer brush marks, though it may require more coats for comparable film thickness. Compare water-based clear polyurethane with the finish maker’s instructions for cure time and recoat interval rather than choosing by label alone.
Apply the finish to clean, dry wood in thin coats, usually two or three for a small box, following the product directions. Lightly sand between coats only when specified, often with 320 grit, and remove the dust. Finish all faces consistently where practical, including the inside, to reduce uneven moisture exchange; do not seal intentional ventilation openings. Let the coating cure fully before putting bread inside. “Dry to touch” is not the same as fully cured, and trapped solvent or odor is a poor start for a food-storage space.



0 Comments