What's inside
As an Amazon Associate I earn from qualifying purchases. This post may contain affiliate links at no extra cost to you.
For a clear-finished mudroom rail, choose a straight, stable board with a grain pattern you like—not just the hardest wood you can find. The rail needs to resist dents from daily use, but good hook placement, solid attachment to studs, and a durable finish matter more than exotic lumber. For most projects, hard maple or white oak is a dependable choice; clear pine can work on a budget if you accept easier denting.
As an Amazon Associate we earn from qualifying purchases at no extra cost to you.


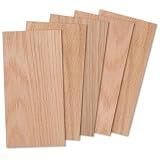
Best wood choices
| Wood | Appearance and workability | Best fit | Main drawback |
|---|---|---|---|
| Hard maple | Light, subtle grain; sands to a clean surface | A bright, understated rail with strong dent resistance | Can show glue marks and sanding scratches under clear finish |
| White oak | Pronounced grain; strong and durable | A rail where visible grain is part of the design | Open pores need extra finish work for a smooth surface |
| Cherry | Fine grain that darkens with light and age | A warm-toned rail with a refined appearance | Costs more than common softwoods and changes color over time |
| Poplar | Fine texture, often greenish or gray; paints well | A painted rail, or a low-cost clear finish where color variation is acceptable | Color can look uneven under clear finish; dents more easily than maple or oak |
| Clear pine | Light with visible growth rings and occasional knots | A simple, inexpensive rail in a low-impact household | Soft surface dents under bags, buckles, and repeated contact |
Choose for the way the rail will be used
For a family mudroom with backpacks, coats, and frequent traffic, hard maple offers a practical balance of hardness and a quiet appearance. White oak is a good alternative if you want the grain to show. Its pores are visible, so the surface may feel less glass-smooth unless you use a pore filler or apply enough finish to level them.
Cherry is attractive when a warmer look matters, but expect it to darken with exposure to light. If you need the rail to match a nearby piece exactly, test a sample and keep it out of strong sunlight while you compare. Poplar is usually a better paint-grade choice than a clear-finish choice: its color can vary from board to board, and clear coating makes those differences more noticeable.
Pine is not automatically a mistake. A straight, knot-free board can make a perfectly serviceable rail, especially for light coats or a rental project. The trade-off is visible in use: a hard-edged bag buckle can leave a dent that would be less obvious on maple or oak.
Select and prepare the board
Buy a board that is dry, straight, and free of splits near the planned hook locations. Sight down both edges and faces at the lumber rack. Reject stock with a twist, a pronounced bow, loose knots, or checks at the ends. A long rail that is already warped is difficult to pull flat without stressing its fasteners.
For a typical rail, 3/4-inch-thick hardwood is workable, but 1-inch stock gives more room for substantial hooks and screw engagement. Choose width based on the hook base and the look you want; leave enough wood above and below each mounting screw that the rail will not split. If the board needs cutting or joining, use a sharp blade and a square reference edge. Dry-fit the pieces before applying glue.
When laminating boards, use a wood glue intended for interior furniture work and spread a thin, even film over the joint. Clamp firmly enough to close the seam, not so hard that all the glue is squeezed out. Wipe squeeze-out while it is still wet, then let the assembly cure for the time on the label before sanding or drilling. A tight, well-fitted joint is more important than adding extra glue.
Sand for a clear finish
Start with 120-grit sandpaper if the board has milling marks, then move to 150 or 180 grit. For maple, stop around 180 grit before finishing; sanding much finer can reduce absorption and contribute to a patchy look with some finishes. Sand with the grain, especially on the final pass. Use a sanding block on edges so they stay flat, and lightly ease sharp corners with a few strokes. Sharp edges chip more readily and are unpleasant where hands and clothing brush past.
Remove dust thoroughly with a vacuum and a clean, lint-free cloth. Avoid pressing oily or waxy tack cloth residue into a surface that will receive a water-based finish. Test your full sanding and finishing sequence on an offcut from the same board. A clear coat changes wood color: water-based products usually add less amber tone, while oil-based finishes deepen and warm many species.
For a low-odor, clear look, consider a water-based clear polyurethane. Apply thin coats rather than one heavy coat, and follow the label for recoat times. Lightly sand between coats if the instructions call for it, commonly with 220 grit, then remove the dust. For a more traditional warm tone, an oil-based clear finish is an option, but allow extra drying time and expect more color shift. Do not use the rail until the finish has cured as directed; dry-to-touch is not the same as fully cured.
Mounting matters as much as species
Hooks create leverage: a loaded backpack pulls outward as well as downward. Fasten the rail into wall studs whenever possible, using screws long enough to pass through the rail and drywall and obtain solid purchase in the framing. Do not rely on short screws driven only into drywall. Locate studs before drilling, mark hook spacing, and check that each hook’s screws will not collide with the rail’s wall-mounting screws.
Predrill hardwood for hook screws to reduce splitting, using a bit slightly smaller than the screw’s root diameter. Keep holes centered and away from board edges. If a screw binds or the wood begins to crack, stop and enlarge the pilot hole rather than forcing it. Poor anchoring can pull the rail off the wall; an undersized pilot hole can split the rail; and a thick, uncured finish can stay tacky where coats or bags press against it.
What to buy
For a durable, light-colored rail, look for a straight hard-maple board from a hardwood supplier or lumberyard. For stronger grain, choose white oak and decide whether you want its pores filled or left visible. If the rail will be painted, poplar is a sensible, often less expensive option. For light-duty use, a clear pine board is fine; spend the savings on solid hooks and proper stud attachment rather than expecting pine to resist every dent.
Useful supplies include sandpaper in 120, 180, and 220 grit and a standard interior wood glue if you are joining boards. Choose the wood for the look and wear level, but treat straight stock, careful sanding, and secure mounting as non-negotiable parts of the job.



0 Comments