What's inside
As an Amazon Associate I earn from qualifying purchases. This post may contain affiliate links at no extra cost to you.
Open pores are the visible vessels and depressions in woods such as oak, ash, mahogany, walnut, and elm. If you apply clear finish directly over them, the coating may look glossy while the surface still feels rough and shows small valleys under reflected light. The reliable fix is to level those pores before the final clear coat, not to keep adding finish and hoping it will fill them.
As an Amazon Associate we earn from qualifying purchases at no extra cost to you.



Our Top Picks
- Minwax Fast Drying Polyurethane Protective Wood FinishQuart4.1 x 4.1 x 5.1 inches1 PoundsCheck on Amazon
- Minwax 1/2 pt 25555 Clear Polycrylic Water-Based Protective8 fl oz2.9 x 2.9 x 3 inches0.65 poundsCheck on Amazon
 Aqua Coat Water-Based Clear Wood Grain Filler GelPint3.55 x 3.55 x 4.2 inches1.14 PoundsCheck on Amazon
Choose the right pore-filling method
For most furniture and cabinet work, a water-based or oil-based grain filler is the best choice. It is made specifically to pack open pores, then sand back almost flush with the surrounding wood. A sanding sealer can help control absorption, but it is not a substitute for filler on deeply open-grained wood. Clear epoxy can fill very deep pores, but it adds mixing, sanding, color, and recoating complications.
| Method | Best use | Advantages | Drawbacks |
|---|---|---|---|
| Water-based grain filler | Painted or clear-finished furniture | Low odor, easy cleanup, fast drying | Can raise grain and dry quickly on large areas |
| Oil-based grain filler | Traditional clear finishes and longer working time | Easy to spread and wipe across large surfaces | Slower drying, stronger odor, oily residue can affect adhesion |
| Clear epoxy | Very deep pores, live edges, or dramatic defects | Fills large voids and levels well when applied correctly | More expensive, harder to sand, can look plastic |
| Sanding sealer only | Close-grained woods such as maple or cherry | Improves sanding and reduces uneven absorption | Will not properly fill open oak or ash pores |
If you are finishing oak or ash with a clear coat, buy a wood grain filler rather than relying on extra coats of polyurethane. Extra clear coats build thickness, but they do not always bridge wide pores without leaving a rippled surface.
Prepare the wood before filling
Sand the bare wood flat before applying filler. Start with 100 or 120 grit only when you need to remove planer marks, glue squeeze-out, or scratches. Follow with 150 grit, then finish at 180 grit for most clear finishes. Sanding much finer than 180 grit can burnish the surface and reduce how well the filler keys into the pores.
Use a firm sanding block on flat panels. Flexible sanding sponges can follow the existing dips instead of removing them. Vacuum the surface and wipe it with a clean, dry cloth. Do not soak bare wood with water unless you intentionally plan to raise the grain first. If you do raise the grain, let the wood dry completely and sand the whiskers lightly with 180 grit.
Check the surface under a strong light held at a low angle. Pencil marks, glue spots, and cross-grain scratches may become much more visible after clear coating. A filler will not hide those defects reliably.
Apply and sand the grain filler
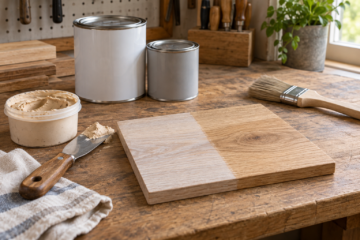
Stir the filler thoroughly, including material settled at the bottom of the container. Spread it across the grain with a plastic scraper, old credit card, or short, stiff squeegee. Work diagonally or at right angles to the grain so the filler is forced into the pores instead of simply being brushed along them.
Apply a thin, tight coat. The goal is to fill the pores, not leave a thick film over the entire board. On open oak, you may need two applications. Let the first coat dry according to the label; many water-based fillers are ready for sanding in roughly 30 to 60 minutes, while oil-based products may need several hours or overnight.
Sand the dried filler with 220 grit on a firm block. Sand only until the excess film is gone from the surface and the pores remain packed. If you sand through the filler everywhere, you applied too little or removed it too aggressively. Wipe or vacuum the dust, then inspect under raking light. Deep pores should appear as filled, level patches rather than dark grooves.
For a very smooth clear finish, a second thin coat is often better than trying to spread one heavy coat. Buy water-based grain filler when low odor and quick cleanup matter. The cheaper option is fine for a small tabletop, but expect more frequent stirring and faster drying at the edge of the work.
Control color and finish compatibility
Grain filler can change the appearance of wood. A light filler may leave pores looking pale, while a dark filler emphasizes the grain and can make oak or walnut look more contrasty. Test the complete schedule on an offcut: stain, filler, sealer, and clear coat. Do not judge the filler color by itself.
Some fillers are intended to go over stained wood, while others are intended for bare wood. Read the label. If you apply an oil-based filler over a stain that has not cured, you can soften or smear the stain. If you apply water-based material over a water-sensitive stain, it may pull color from the surface.
After the filler has been sanded, apply a compatible sealing coat. A thin coat of dewaxed shellac is useful as a barrier when the filler, stain, and clear finish are from different product types. Let it dry, then scuff lightly with 320 grit. If you prefer a conventional sanding sealer, choose one recommended for the clear finish you plan to use.
Use epoxy only for unusually deep pores
Clear epoxy makes sense for large pores, knot voids, and decorative live-edge work where ordinary filler would shrink or fall out. Mix it accurately by the manufacturer’s ratio, scrape it tightly across the surface, and remove ridges before it cures hard. A cured epoxy surface is much harder to sand than wood, so avoid leaving a thick blanket over the whole panel.
Epoxy can also darken the wood, trap bubbles, and create a glossy plastic-looking patch. Sand cured epoxy progressively from about 120 or 150 grit through 220 grit, then seal and apply the clear coat. For normal oak furniture, grain filler is cheaper, faster, and easier to repair.
Apply the smooth clear coat
Once the filled surface is level and dust-free, apply thin clear coats rather than one heavy coat. Brush or spray with the grain, keep a wet edge, and follow the product’s recoat window. Heavy coats can sag, trap solvent, and remain soft underneath even when the surface feels dry.
After the first coat dries, scuff-sand lightly with 320 or 400 grit to remove nibs. Do not sand through at edges or on corners. Vacuum carefully and wipe according to the finish manufacturer’s instructions. Two to four thin coats are common for polyurethane or lacquer, but the correct number depends on the product and the required protection.
If the surface still shows pores after the first clear coat, do not immediately apply several thick coats. Let it dry, sand it level, and apply another thin coat. If pores remain clearly recessed after that, the original filling step was incomplete and should be corrected before chasing gloss.
For the highest gloss, allow the final coat to cure fully—often several days, and sometimes longer for oil-based finishes—before polishing. A smooth clear coat depends more on level substrate preparation than on the brand or sheen of the finish.

0 Comments