What's inside
As an Amazon Associate I earn from qualifying purchases. This post may contain affiliate links at no extra cost to you.
Small knots, pinholes, worm tracks, cracks, and chipped edges are common in otherwise useful boards. Two practical fillers are epoxy and cyanoacrylate (CA) glue. Both can produce a clean repair, but they behave very differently once you sand, stain, and finish the wood.
For a pinhole or hairline crack, CA glue is often the faster and cheaper choice. For a void that is deep, wide, irregular, or visible from both sides, epoxy is usually easier to control and more durable. The best choice depends less on the label and more on the size of the defect, the wood species, and the final finish.
As an Amazon Associate we earn from qualifying purchases at no extra cost to you.



Our Top Picks
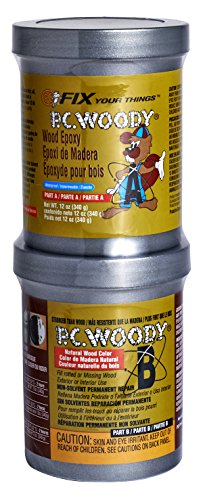 PC Products PC-Woody Wood Repair Epoxy Paste12 oz2.75 x 2.75 x 5.75 inches0.75 poundsCheck on Amazon


Epoxy and CA glue at a glance
| Factor | Epoxy | CA glue |
|---|---|---|
| Best void size | About 1/16 inch to larger cavities | Pinholes and cracks up to roughly 1/32 inch |
| Working time | Usually 5 to 30 minutes, depending on formula | Seconds to a few minutes |
| Builds thickness | Yes; can be poured in layers | Limited; deep fills can cure poorly |
| Sanding | Easy after full cure, though harder than soft wood | Hard and sometimes brittle; can clog abrasive |
| Color and appearance | Clear, amber, opaque, or pigmented | Usually clear, but may darken or leave a glossy spot |
| Water resistance | Good after complete cure | Varies; not the best choice for a damp location |
When CA glue is the better filler
CA glue works well for defects that are narrow and shallow: end-grain checks, tiny cracks around knots, small tear-out holes, and pinholes left after sanding. Thin CA wicks into a crack by capillary action. Medium or thick CA stays closer to the surface and is more useful when the defect is slightly wider.
Use thin and medium CA glue as a spot repair, not as a general-purpose substitute for wood filler. Mask around the repair with low-tack tape, add one or two drops, and let it cure. A CA accelerator can shorten the wait, but spraying too much may cause a white haze or a rough, brittle surface.
CA is especially convenient on already-sanded parts where you do not want to mix a batch of filler. It also makes a hard repair in soft woods such as pine, cedar, and poplar. The drawback is that the repaired spot can sand more slowly than the surrounding wood. If you keep sanding until the glue is level, you may create a shallow dish in the wood around it.
CA glue can also “bloom,” leaving a cloudy halo on dark or oily species such as walnut, rosewood, and some tropical woods. Test on an offcut first. The fumes are irritating, and cotton or wool can generate heat when soaked with CA, so keep glue and applicators away from those materials.
When epoxy is the better filler
Epoxy is the more forgiving choice for a real void. It does not need to wick into the defect; it bridges gaps and can be shaped after curing. Use it for knot voids, chipped corners, cracks wider than a hairline, and cavities deeper than about 1/16 inch. It is also the better option when the defect needs to be filled flush in one controlled operation.
Choose a two-part clear epoxy for wood filling if you want the repair to remain subtle. For a deliberate contrast, tint the epoxy with compatible pigment, mica, or fine sanding dust. Sanding dust alone often produces a muddy color and can make the mixture lumpy; it is best used sparingly.
Epoxy normally needs accurate measuring and thorough mixing. Scrape the sides and bottom of the mixing cup, then mix for at least two minutes unless the manufacturer specifies otherwise. Deep pours can overheat as they cure. For a cavity deeper than roughly 1/4 inch, use a deep-pour formula or fill in layers, allowing each layer to cure before adding the next.
Do not use a fast five-minute epoxy for a large or deep fill simply because it is convenient. It may become hot, shrink slightly, or leave bubbles trapped in the repair. Slow-setting epoxy gives bubbles more time to rise and gives you time to level the surface.
Prepare the wood before filling
Remove loose fibers and crumbly edges with a sharp chisel, knife, or small rotary tool. The repair needs solid wood to bond to. Vacuum the defect, then wipe oily species with a solvent recommended for that wood and adhesive. Do not flood the area; solvent left in the pores can interfere with curing.
For epoxy, lightly scuff glossy or previously finished surfaces with 80- to 120-grit abrasive. Bare wood should be dry and free of sanding dust. If the void goes through the board, tape the underside with painter’s tape or packing tape. Seal porous end grain around a large cavity with a thin coat of epoxy first if you see significant seepage.
CA needs an even cleaner, drier surface. Avoid applying it over wax, oil, stain, or uncured finish. Because CA runs quickly, position the board level before dispensing it.
Filling, leveling, and sanding
Overfill epoxy slightly, usually by 1/16 inch or less, so it can be sanded flush. A plastic spreader or old gift card works well. Pop visible bubbles with a brief pass of warm air, but do not use a torch near dry wood or a large epoxy pool.
Let epoxy cure for the full stated time. “Hard to the touch” is not the same as ready to sand; many products need 24 hours, and cool temperatures can extend that time. Start leveling with 80 or 100 grit on a hard sanding block, then move through 120, 150, and 180 grit. On furniture, stop at 180 or 220 unless the finish manufacturer calls for finer sanding.
CA repairs can often be sanded after 5 to 15 minutes, but a thicker application may need longer. Use a firm block and light pressure. If the abrasive clogs, replace it rather than pressing harder. A sharp card scraper can level a proud CA spot or epoxy patch before sanding.
How the repair affects stain and finish
Neither cured epoxy nor cured CA absorbs stain like wood. A stained board may therefore show a light or dark patch around the repair. This is most noticeable with penetrating stains on open-grained woods such as oak, ash, and walnut. For a stain-grade project, test the entire repair method on scrap, including sanding and finish.
If color matching matters, tinted epoxy is usually more predictable than trying to stain clear epoxy later. For a painted project, either adhesive can work, but epoxy generally fills larger defects with fewer coats of primer. Use a suitable sanding primer for wood repairs after leveling.
Choose CA when the defect is tiny, the board is already close to finished, and speed matters. Choose epoxy when you need volume, controlled placement, gap-filling strength, or a repair that will be sanded and shaped. For a small pinhole, epoxy is unnecessary; for a deep knot void, CA is usually the wrong tool.

0 Comments