What's inside
As an Amazon Associate I earn from qualifying purchases. This post may contain affiliate links at no extra cost to you.
Matching filler to a clear-finished surface is harder than matching it to stained wood. Clear finish leaves the wood’s natural color visible, and the color varies between boards, grain lines, end grain, and even areas of the same board. Filler also reflects light differently from wood. A patch that looks close when wet or under workshop lighting may stand out after it dries and gets coated.
For small nail holes, a close color match is often good enough. For a visible split, chip, or knot hole, consider whether the repair can be hidden with a wood sliver or a shaped plug instead. Those use real wood grain and usually blend better than filler.
Identify the wood and finish before buying
First check whether the surface is bare, sealed, or already finished. Filler intended for bare wood may not stick reliably to a glossy finish, while sanding a finished surface to prepare a repair can create a larger visible patch. If the coating is already on the piece, test any repair method in an inconspicuous spot or on a matching offcut.
On bare wood, look at the color after wiping a small area with mineral spirits or water, if appropriate for the species and finish plan. The temporary darkening gives a better preview of how the wood may look under clear finish than dry, freshly sanded wood does. Let the test area dry before deciding. Oak’s open pores, maple’s pale, even grain, and cherry’s gradual color change all create different matching challenges.
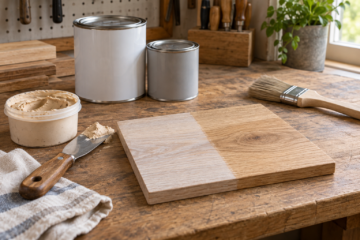
Make a sample from the same species when possible. Sand it to the same grit you plan to use on the project, apply the intended clear finish, and compare fillers after they have dried and been coated. A sample finished only with clear coat may still differ from the finished piece if the wood has aged or received a sealer.
Choose a filler that suits the repair
For small holes and shallow defects in unfinished wood, use a sandable wood filler made for the job. Many fillers shrink slightly as they dry, so press them firmly into the hole and leave a small excess to sand level. Follow the label for drying time; thick fills can take longer than the surface suggests.
For a more convincing color match, use a stainable wood filler and test it with the actual clear finish. “Stainable” does not mean it will absorb stain like the surrounding wood. Filler often takes stain unevenly or remains lighter or darker, especially when it contains fine wood fibers and binders.
For tiny pinholes on an already finished surface, a hard-wax repair stick can be easier than sanding and recoating. These are often available in several colors and can be blended, but they are a surface repair, not a structural fix. They may soften with heat and can look glossy or waxy beside a matte finish.
| Repair option | Best use | Main trade-off |
|---|---|---|
| Sandable wood filler | Small defects in bare wood | Color and grain rarely match exactly under clear finish |
| Stainable wood filler | Bare wood when a color adjustment may help | May absorb stain differently from the wood |
| Hard-wax repair stick | Tiny holes in a finished surface | Does not restore grain or provide a strong structural repair |
| Wood sliver or plug | Visible chips, larger holes, or defects near an edge | Requires fitting and grain alignment |
Test the color under the real finish
Do not rely on the filler’s color in the tub. Spread a small amount into a test hole or shallow groove on scrap. After it has dried, sand it flush with the surrounding surface, then apply the same clear finish you plan to use. A clear coat can make wood and filler look darker, warmer, or more saturated. Compare the sample only after the coating has dried.
Test more than one color if the filler comes in a range. A blend of two colors may be closer than a single shade, but mix only as much as needed and record the proportions. If a filler is clearly too dark or too light once coated, adding more finish will not fix the mismatch; sand the sample back and test another blend.
Lighting changes what you see. Check the sample in daylight and in the room where the piece will sit. A match under warm shop lights may look noticeably different beside a window. View it from normal standing distance as well as close up.
Apply carefully and sand without widening the patch
Remove dust and loose fibers before filling. Use a narrow putty knife or a small flexible scraper, and press filler into the defect rather than smearing a broad layer across the grain. A wide smear leaves a halo that can be difficult to sand away without making a shallow dish in the surrounding wood.
Let the filler dry fully, then sand it flush with the surface. For many furniture and trim repairs, starting around 120 or 150 grit and finishing at 180 or 220 grit is reasonable, but follow the finish maker’s instructions. Use a small sanding block on flat surfaces so you do not round over an edge or create a dip. Vacuum or brush away dust before applying finish; trapped dust can make a repair look cloudy.
Use a light touch near the edges of a filled hole. Sanding too aggressively can expose fresh wood around the patch, making the repaired area appear larger. If the filler sinks after drying, add a second thin application rather than trying to disguise a deep depression with finish.
Use real wood when the repair will be prominent
If the defect is larger than a small fastener hole, sits in a strong grain line, or is on a highly visible tabletop, filler may remain obvious even when its color is close. A fitted sliver or plug from matching wood can preserve grain and reflect light more like the surrounding surface. Align the grain direction and, where possible, choose stock from the same board.
For an inexpensive project or a hole hidden on the back or underside, ordinary filler is often the sensible choice. For a clear-finished surface viewed up close, spend time on a coated sample before committing. That small test can prevent a repair that is technically smooth but more noticeable than the original defect.

0 Comments