What's inside
- Quick picks by situation
- What a complete pen turning kit should include
- Head-to-head: which kit configuration makes sense?
- Lathe compatibility matters more than the kit label
- Real cost: the “complete” kit test
- Assembly difficulty and common beginner mistakes
- Durability and ownership costs
- Final recommendation
- Related Guides
- Quick picks by situation
- What a complete pen turning kit should include
- Head-to-head: which kit configuration makes sense?
- Lathe compatibility matters more than the kit label
- Real cost: the “complete” kit test
- Assembly difficulty and common beginner mistakes
- Durability and ownership costs
- Final recommendation
- Related Guides
As an Amazon Associate I earn from qualifying purchases. This post may contain affiliate links at no extra cost to you.
The best pen turning kit for beginners is a complete bundle built around a 7 mm slimline or 7.8 mm European pen kit, a #2 Morse taper mandrel, correctly matched bushings, and a lathe with at least 12 inches between centers; for most new turners, a mid-priced bundle from a specialist pen supplier is a better buy than the cheapest “starter kit.”
As an Amazon Associate we earn from qualifying purchases at no extra cost to you.

Quick picks by situation
| Best choice | Recommended for | Typical contents | Expected total cost in 2026 |
|---|---|---|---|
| Basic slimline bundle | Lowest-cost first project | Mandrel, slimline bushings, 5–10 blanks, 7 mm tubes, glue, basic assembly tool | $45–$85, excluding lathe and cutting tools |
| Adjustable mandrel bundle | Beginners making several pen styles | Adjustable mandrel, 2–4 bushing sets, tubes, blanks, barrel trimmer, glue | $90–$160 |
| Premium starter system | Frequent use and fewer upgrades | Quality mandrel, multiple bushing sets, carbide or HSS pen tools, trimmer, press, blanks | $180–$350 |
| Lathe-and-kit package | Buyers starting without a lathe | Mini lathe, chuck or drive accessories, pen kit, mandrel, bushings and blanks | $350–$750 |
What a complete pen turning kit should include
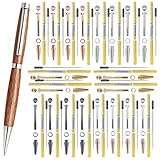
A pen kit is not the same as a pen turning kit. The former usually contains only the finished hardware and brass tubes. The latter should provide the items needed to drill, mount, turn and assemble at least one pen.
- Mandrel: A standard #2 Morse taper mandrel fits many mini lathes, including common models from WEN, RIKON and JET. Check the taper before buying; a #1 Morse taper mandrel will not fit a #2 spindle without an adapter.
- Bushings: These establish the finished diameter at the ends of each barrel. They must match the exact pen kit, not merely the general pen style.
- Blanks: Wood, acrylic or hybrid blanks should be drilled to suit the included tubes. A useful starter bundle contains at least five blanks, because early attempts often reveal technique problems.
- Drill bit: Slimline pens commonly use a 7 mm bit, but some European and comfort-grip kits use 8 mm, 10 mm or larger tubes. A kit without the correct bit is incomplete in practical terms.
- Adhesive: Thick or medium cyanoacrylate is convenient for porous blanks; two-part epoxy gives more working time and is useful when tube fit is loose.
- Barrel trimmer: This squares the blank to the tube. It is helpful, but it must match the tube diameter and be used with a drill or suitable arbor.
- Assembly method: A small hand press, clamp or threaded assembly tool is needed to install the components without crushing or misaligning them.
Head-to-head: which kit configuration makes sense?
1. Basic slimline starter kit
This is the sensible choice for someone making one or two pens to learn the process. Slimline hardware is widely available, the barrels are short, and a 7 mm drill bit is inexpensive. Most kits use two narrow blanks separated by a center band, so minor shaping errors are less visible than on a single-piece cigar-style pen.
The limitation is that the supplied mandrels and bushings are often designed for one hardware profile. If you later switch to a bolt-action, cigar or rollerball kit, you may need another bushing set and sometimes a different drill bit. The lowest-cost kits also frequently omit a pen press and barrel trimmer.
2. Adjustable mandrel bundle
An adjustable mandrel is the better long-term choice if you expect to turn more than about a dozen pens. Its shaft length can be changed for shorter or longer blanks, reducing unused overhang and vibration. That matters because a long, unsupported mandrel flexes under cutting pressure and can produce tapered barrels.
Look for a mandrel with a #2 Morse taper, a steel shaft around 6 mm in diameter, and a replaceable or adjustable spacer system. A mandrel saver tailstock center is a useful upgrade because it applies pressure to the mandrel shaft rather than repeatedly compressing the end nut and threads.
3. Premium pen-making system
Premium systems cost more because they solve repeatability problems. They may include a dedicated pen lathe, a quality mandrel, multiple bushing sets, a barrel trimmer, a pen press and sharper cutting tools. This is overkill for a single project, but it can be economical for regular production.
The key question is whether the package includes consumables and compatible accessories, rather than simply carrying a premium brand name. A bundle with three bushing sets and no drill bit may be less useful than a cheaper bundle containing one complete, matched setup.
Lathe compatibility matters more than the kit label
Most pen kits can be turned on a mini lathe, but the lathe must meet a few practical requirements:
- Swing: At least 8 inches is more than enough for pen blanks, which are generally under 1 inch square.
- Between centers: Allow at least 12 inches. A pen mandrel and tailstock consume less space than a bowl setup, but extra capacity makes mounting easier.
- Spindle taper: #2 Morse taper is the most convenient standard for many current mini lathes and accessories.
- Spindle thread: Common mini-lathe threads include 1 inch by 8 TPI, but this affects chucks and faceplates more than a basic pen mandrel.
- Speed control: Variable speed from roughly 500 to 3,500 RPM is preferable. Start around 1,000–1,500 RPM for rough shaping and increase only when the blank is balanced.
Models such as the WEN 3420, WEN 3421, RIKON 70-105 and JET JWL-1015 represent the kind of mini-lathe platform commonly used for pen turning. Confirm the exact Morse taper and spindle specifications for the version sold in your market before ordering a mandrel.
Real cost: the “complete” kit test
Suppose a $65 slimline bundle includes a mandrel, bushings, ten blanks, tubes and glue, but omits the tools needed to finish the job. A realistic addition might look like this:
- 7 mm drill bit: $8–$15
- Barrel trimmer and shaft: $20–$35
- Basic pen press: $35–$60
- Turning tools or a small carbide pen tool: $35–$75
- Eye protection and dust mask: $15–$35
That makes the usable total approximately $178–$285 before a lathe. If you already own a drill press, suitable drill bit and turning tools, the same kit may be a good value. If you own none of them, a $150–$220 bundle containing the press, trimmer and tool can be cheaper than assembling the lowest-priced package piece by piece.
For repeated use, calculate the consumable cost as well. A $60 bundle containing ten blanks and hardware costs $6 per supplied pen before glue, sandpaper and finish. If a pen uses about $1.50 of abrasive and finish, the material cost is roughly $7.50 per pen. A failed blank raises the first few projects’ average cost considerably, which is why five extra blanks can be more valuable than an additional decorative pen kit.
Assembly difficulty and common beginner mistakes
A slimline pen is usually the easiest style: drill two blanks, glue in the tubes, square the ends, mount the blanks between bushings, turn to diameter, sand, finish and press in the hardware. Allow two to four hours for a first careful attempt, including adhesive curing and cleanup.
The most common mistakes are preventable:
- Using the wrong bushings: Compare the bushing profile with the instruction sheet before turning. A nearly matching set can leave steps at the center band.
- Forcing a dull drill bit: Heat can soften acrylic and weaken the glue bond. Withdraw the bit often to clear chips and use moderate pressure.
- Over-tightening the mandrel nut: Excess pressure can bow the shaft or split a blank. Tighten only enough to eliminate movement.
- Turning below the bushing diameter: The pen may look attractive but its hardware will sit proud of the wood. Stop frequently and measure with calipers.
- Pressing components crooked: Support the part squarely and advance the press slowly. If resistance suddenly increases, stop rather than forcing it.
Durability and ownership costs
Bushings wear first, especially when abrasive paper touches their edges. A bushing set may last through dozens of pens if kept clean, but a frequently used set can lose its reference diameter much sooner. Keep separate labeled bags for each pen style and replace bushings when their shoulders are visibly rounded.
Mandrel threads and the end nut can collect finish and dust. Clean them with a brush, avoid cross-threading, and store the shaft straight. Drill bits eventually become dull; a bit that burns the blank is usually costing more in failed work than a replacement bit. Sandpaper, thin- and medium-cure adhesive, finish and polishing compounds are recurring costs, not one-time purchases.
Final recommendation
Choose a basic slimline bundle if your budget is under $100 and you already have a compatible lathe and turning tools. Choose an adjustable #2 Morse taper bundle if you plan to make different pen styles or more than a dozen pens. Choose a premium system or lathe-and-kit package only when the included press, trimmer, tool and bushings are genuinely useful; otherwise, the extra price may buy accessories you will replace.
Before ordering, verify five details: the lathe taper, the exact pen-kit model, the bushing set, the drill-bit size and whether a press and barrel trimmer are included. Those checks reveal the real value of a beginner kit far more reliably than the word “complete” on its packaging.
0 Comments