What's inside
As an Amazon Associate I earn from qualifying purchases. This post may contain affiliate links at no extra cost to you.
Our Top Picks
 Varathane Water-Based Ultimate Satin PolyurethaneHalf Pint (Pack of 1)3 x 3 x 3 inches0.64 poundsCheck on Amazon
Before you start
Clear finish protects veneer and changes its appearance, but the thin wood layer limits how aggressively you can sand. Many cabinet and furniture veneers are less than 1 mm thick; a few passes with a power sander can cut through to the substrate. The safest approach is to clean carefully, make only light hand-sanding passes, and test the full finishing schedule on an inconspicuous spot or scrap from the same project.
Check that the veneer is firmly bonded before applying liquid finish. Press down around edges and seams; bubbles, loose corners, or hollow-sounding areas need repair first. Finish will not glue down lifted veneer, and moisture from water-based products can make a weak bond worse. Avoid soaking the surface at every stage.
Choose a clear finish
Polyurethane is a practical choice for tabletops, cabinets, and other surfaces that need good wear and spill resistance. Water-based polyurethane usually dries clear and has less odor, but can raise grain and may look cooler or less amber than oil-based polyurethane. Oil-based polyurethane adds a warm tone and often gives longer working time, but takes longer to dry and can yellow lighter woods over time.
For a less plastic-looking surface, wipe-on polyurethane or a hardwax oil can be easier to apply in thin coats. They generally offer less protection per coat than a built-up film finish, so follow the label and expect more maintenance on heavily used surfaces. Shellac dries quickly and can be useful as a sealer, but water and alcohol can damage it; it is not the best final coat for a surface exposed to spills. Compare suitable water-based polyurethane finishes and choose by intended use, sheen, and cleanup method rather than price alone.
| Finish type | Good fit | Main trade-off |
|---|---|---|
| Water-based polyurethane | Light-colored veneer; lower odor and faster recoating | May raise grain; usually adds little warm color |
| Oil-based polyurethane | Durable film with a warmer appearance | Longer drying, stronger odor, and possible yellowing |
| Wipe-on finish | Small projects or easier control on edges | More coats may be needed for comparable film build |
| Hardwax oil | Natural-looking furniture surfaces | Typically needs more upkeep than a thick film finish |
Use a finish compatible with any stain or sealer already on the wood. If the surface has an unknown coating, test adhesion and appearance in a hidden area before committing.
Prepare the surface without cutting through
Remove dust and grease with a clean, lint-free cloth and a cleaner appropriate for the existing surface. Let the wood dry fully. Do not use a tack cloth that leaves oily residue unless its manufacturer says it is compatible with your finish. If you are unsure whether the veneer is bare or already coated, test a small hidden area: water beading may indicate an existing finish, though it is not a definitive test.
On bare veneer, hand-sand lightly with 180- or 220-grit paper, moving with the grain. The goal is to remove small raised fibers and nibs, not level the panel. Do not use a belt sander or press hard with an orbital sander. On an intact factory finish that you plan to coat, follow the finish maker’s instructions; a light scuff with 220-grit may improve adhesion, but sanding through edges or corners is easy. For narrow edges, use a sanding sponge gently. Vacuum dust, then wipe with a clean dry cloth.
If the veneer is stained, avoid sanding through the color layer. If you see a pale patch, stop: that may be substrate showing through, and clear finish will not disguise it. Repairing a breakthrough may require color matching or replacing the veneer, not another coat of clear finish.
Apply thin, even coats
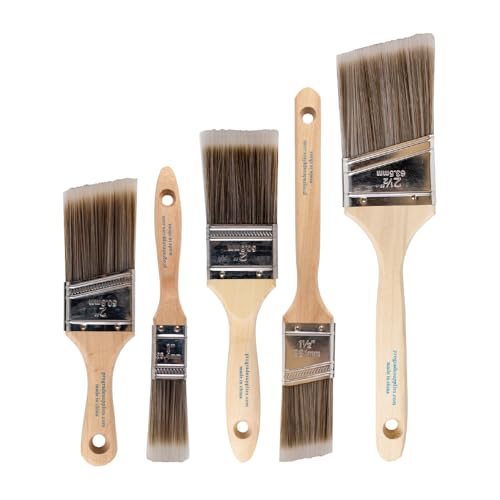
Work in a clean, well-ventilated space within the temperature range on the product label. Stir finishes that contain flattening agents; do not shake them, which can introduce bubbles. Pour a small amount into a separate container so dust or a used brush does not contaminate the can. Use a good synthetic brush for most water-based finishes or a compatible natural-bristle brush for many oil-based finishes; check the label. A synthetic finishing brush is a reasonable low-cost choice for water-based polyurethane.
Brush with the grain in long strokes, keeping a wet edge and avoiding repeated brushing as the finish begins to tack. Apply a thin coat, especially on edges and corners where runs collect. For wipe-on products, use a clean lint-free cloth and spread the finish evenly without leaving puddles. Do not try to get full coverage in one heavy coat: thick coats dry slowly, sag, and can trap dust or solvents.
Let each coat dry for the time stated on the can. “Dry to touch” does not mean ready to sand or recoat; temperature, humidity, and heavy application can extend the wait. If the finish feels tacky, give it more time rather than sanding it. Between coats, lightly hand-sand with 320-grit or a fine finishing pad only when the label calls for it and the coat is fully dry. Remove sanding dust before recoating. Two or three coats are common for polyurethane, but follow the product instructions; wipe-on products may need more.
Avoid common failures
Dust nibs usually come from a dirty room, clothing, or brush. Let the coat dry, remove only the raised specks with a very light scuff, and clean thoroughly before the next coat. Runs come from excess finish, particularly on vertical panels and edges; catch them while wet with a lightly loaded brush, but do not keep working the surface once it starts to set.
Cloudiness can result from moisture, incompatible layers, or applying another coat before the previous one has cured enough. Stop, check the label, and allow additional drying time before adding anything. Poor adhesion often points to wax, grease, silicone polish, or a glossy coating that was not properly scuffed. In that case, more finish will not fix the bond.
Allow the final coat to cure before placing objects on the surface. A finish may feel dry within hours but need several days or longer to reach useful hardness; the label gives the best guide. Use felt pads and avoid standing water during the early cure period.



0 Comments