What's inside
As an Amazon Associate I earn from qualifying purchases. This post may contain affiliate links at no extra cost to you.
Oily tropical hardwoods such as teak, ipe, rosewood, cocobolo, and many ebony species are harder to glue than common woods like maple or pine. Their natural oils can interfere with wetting and adhesion, and some species contain extractives that remain on the surface after machining. A joint may look tight when assembled, then open weeks later as the glue fails at the wood line.
For most demanding joints, a slow-setting, two-part epoxy is the safest choice. It tolerates small gaps, bonds to difficult surfaces better than ordinary wood glue, and gives you enough open time to align a large or complicated assembly. For clean, freshly machined joints, a quality aliphatic resin glue can be cheaper and easier to sand, but preparation becomes much more important.
As an Amazon Associate we earn from qualifying purchases at no extra cost to you.


Our Top Picks


Best glue options
| Glue type | Best use | Main advantage | Main weakness |
|---|---|---|---|
| Two-part epoxy | Oily woods, end grain, mixed-material joints, small gaps | Strong adhesion and gap filling | Messier, slower, and harder to sand |
| Aliphatic resin wood glue | Fresh, tight-fitting indoor joints | Inexpensive and easy to use | Less forgiving of oil and poor preparation |
| Resorcinol glue | Exterior and structural work with tight joints | Excellent water and heat resistance | Needs accurate joints, pressure, and careful mixing |
| Polyurethane glue | Occasional outdoor or dissimilar-material work | Water resistant and gap filling | Foam does not create a strong structural joint by itself |
| Cyanoacrylate | Small repairs and temporary positioning | Very fast setting | Brittle and unsuitable for most load-bearing joints |
Choose a slow-curing two-part epoxy when the wood is visibly oily, the joint is not perfectly tight, or the piece will see moisture and temperature changes. A five-minute epoxy is convenient, but it often gives poor working time and can become rubbery or brittle depending on the formula. A product with a working time of roughly 20 to 45 minutes is easier to spread, clamp, and clean up.
Surface preparation matters more than the brand
Do not glue a joint immediately after applying an oil, wax, polish, or finish. Remove those contaminants first. Machine or plane the mating surfaces shortly before assembly, then sand lightly with fresh 80- to 120-grit abrasive if needed. Avoid highly polished surfaces; a uniformly dull surface gives the adhesive some texture to grip.
Wipe the joint faces with a fast-evaporating solvent that is compatible with the wood and your work area. Acetone is commonly used because it cuts many natural oils and evaporates quickly. Make a test wipe on scrap first: some tropical woods can darken, bleed color, or leave residue on the cloth. Use clean, lint-free rags and change to a fresh section frequently. A dirty rag simply spreads oil back over the joint.
Allow the solvent to evaporate completely. Do not apply epoxy while the surface is visibly wet, and do not touch the prepared faces with bare fingers. For extremely oily species, machine the surfaces, solvent-wipe them, and glue soon afterward rather than leaving them exposed overnight.
How to use epoxy successfully
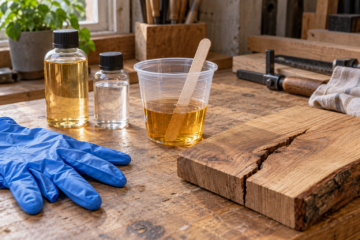
Measure the resin and hardener accurately. For a two-to-one or one-to-one system, use the manufacturer’s specified ratio; guessing by eye can leave a soft or under-cured adhesive. Mix slowly but thoroughly, scraping the sides and bottom of the cup for at least one minute. Mix only enough for the batch, because epoxy can heat up rapidly in a deep container.
Brush a thin coat onto both wood surfaces. On porous end grain, allow the first coat to soak in for several minutes, then apply enough additional epoxy to leave a continuous film. Avoid forcing a large amount into a tight joint. Excess glue increases squeeze-out without improving the bond.
Clamp until the pieces cannot shift, but do not crush the joint dry. Moderate pressure is enough. For many epoxies, leave the assembly clamped for 8 to 12 hours and avoid stressing it for 24 hours. Cool temperatures can extend cure time substantially; below about 60°F, check the product instructions rather than relying on normal shop times.
Epoxy is especially useful for a scarf joint, a tenon with slight clearance, or a wood-to-metal connection. It is not a substitute for a well-designed joint. A wide, loose gap filled entirely with adhesive can still fail under bending or impact.
When ordinary wood glue is fine
The cheaper option is reasonable for indoor furniture when the joint is tight, the wood has been freshly cut, and you can prepare it properly. A conventional aliphatic resin wood glue is easy to spread, cleans up with water before curing, and generally sands more easily than epoxy.
Apply it to freshly prepared surfaces, assemble promptly, and maintain firm, even clamping for at least 30 to 60 minutes. Leave the joint undisturbed for 24 hours before heavy use. Test the same wood and preparation on scrap first. If the glue beads up instead of forming a wet, continuous film, the surface is still contaminated or too oily for that adhesive.
For exterior work, resorcinol is a serious option when the joint is accurately fitted and the darker glue line is acceptable. It has excellent weather and heat resistance, but it is less forgiving than epoxy and usually requires longer clamping. Polyurethane is often marketed as a solution for difficult woods, but its expanding foam is not the load-bearing part of the joint. It still needs clean, properly fitted surfaces.
Test before committing the project
Make two or three scrap joints from the same board. Use the same machining, solvent wipe, glue, and clamp pressure you plan to use. After curing, try to break the samples. A good test usually shows wood fibers pulled from the surface rather than a clean layer of adhesive separating from the wood.
Watch for these failure signs: glue beading instead of wetting the surface, a glossy oily film on the wood, a joint that shifts under light clamping, or a clean adhesive-to-wood separation after curing. If any appear, recut or sand the joint, solvent-wipe again, and switch to epoxy. For valuable or structural work, that small test is cheaper than repairing a failed finished assembly.

0 Comments