What's inside
As an Amazon Associate I earn from qualifying purchases. This post may contain affiliate links at no extra cost to you.
Our Top Picks


The short answer
A hand plane is the better tool for flattening a solid-wood board when you want to remove high spots accurately, preserve a clean surface, and avoid filling the shop with dust. A belt sander is faster for rough stock, glued panels, paint removal, and jobs where a small amount of tear-out is acceptable.
Neither tool replaces a jointer or thickness planer in every situation. A belt sander can make a board thinner, but it is easy to create dips and waves. A hand plane can flatten a board well, but it requires a sharp iron, a reasonably flat reference surface, and more time. The right choice depends on how uneven the board is, the wood species, and the finish you plan to apply.
As an Amazon Associate we earn from qualifying purchases at no extra cost to you.


How each tool removes material
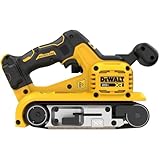
A belt sander removes wood with an abrasive belt running continuously over two drums. Coarse belts, such as 40- or 60-grit, remove material quickly. The problem is that the sanding belt follows the operator’s pressure and the board’s existing shape. Press harder in one area and you can create a hollow. Pause at the ends and you may round over the edges.
A hand plane cuts with a blade set at a controlled angle. A long-bodied plane bridges low areas while cutting high spots, which makes it naturally suited to flattening. A jack plane or fore plane can remove material quickly, while a jointer plane checks and straightens the surface afterward. A smoothing plane is for the final surface, not for correcting a badly twisted board.
For serious hand-tool work, a woodworking jack plane is the useful starting category. Keep the iron sharp; a dull plane needs excessive force and tends to tear the fibers instead of slicing them.
Belt sander vs. hand plane
| Factor | Belt sander | Hand plane |
|---|---|---|
| Speed on rough boards | Fast, especially with 40- to 80-grit belts | Fast after setup, but slower for very hard or badly uneven stock |
| Surface control | Moderate; easy to create dips and rounded edges | High when the blade and sole are properly prepared |
| Dust | Heavy dust production; extraction is strongly recommended | Produces shavings rather than airborne dust |
| End grain and glue | Works on both, but belts clog on some glue and finishes | Can cut end grain and glue cleanly with a sharp blade, though technique matters |
| Learning curve | Easy to start, difficult to use precisely | More setup and technique, but predictable once tuned |
| Best use | Rough shaping, paint removal, glue squeeze-out, and fast stock removal | Flattening, straightening, and preparing a surface for finish sanding |
When a belt sander is the better buy
Choose a belt sander when the board has heavy mill marks, uneven glue joints, old paint, or damage that would take too long to remove by hand. It is also practical for reclaimed lumber, where hidden grit or embedded metal can quickly ruin a plane iron. A cheap board used for shelving, shop fixtures, or a painted project may not justify the time and tuning that hand-planing requires.
Use a coarse belt only until the major high spots are gone. Follow with 80- or 100-grit, then switch to a random-orbit sander for 120- through 180-grit finishing. Do not try to make the belt sander produce the final surface. Sanding scratches from a 40-grit belt can require several later grits to remove, particularly in hard maple, beech, and other dense woods.
A corded belt sander with dust collection is usually the sensible category for flattening boards. A 3-by-21-inch machine offers a useful balance of coverage and control. Smaller sanders are easier to handle but take longer; larger units remove stock quickly and are more tiring to control.
Mark the board with a pencil grid before sanding. Work diagonally across the grain at first, using light, even pressure and keeping the machine moving. When most pencil marks are gone, make a few passes with the grain. Check with a straightedge every few minutes. If you can see light under the straightedge in the middle or at the ends, stop sanding that area rather than trying to correct it by feel.
When a hand plane is the better choice
Use a hand plane when flatness matters more than speed. It is particularly effective on solid boards for tabletops, cabinet parts, doors, and joinery. A properly set plane removes a shaving from the high area without abrading the entire surface, so it preserves thickness and gives you direct feedback about the board’s shape.
Before planing, inspect the board for nails, staples, sand, and hardened glue. Mark the high areas with pencil. Plane across the grain or at a skewed angle for fast stock removal, then take longer passes with the grain. Keep the blade projection modest; a deep cut can cause tear-out and make the plane difficult to push.
Wood grain direction matters. Planing against the grain can lift chunks from the surface, especially in figured maple, oak around knots, and reversing-grain boards. If tear-out starts, reduce the cut, skew the plane, sharpen the iron, or plane from the opposite direction. A high cutting angle or a tight mouth can help, but neither compensates for a dull blade.
You will also need a way to check the work. A straightedge at least 24 inches long is useful for most furniture boards, while winding sticks reveal twist. Check along the length, across the width, and diagonally. A board can look flat from one direction while still being twisted.
The most reliable workflow
For a rough board, remove the worst defects with a belt sander or scrub plane, then use a hand plane or random-orbit sander for refinement. For a glued panel, scrape cured glue first, flatten the proud joints carefully, and avoid dwelling over one seam. Excess heat from aggressive sanding can soften some adhesives and load the abrasive.
If you use only a belt sander, stop when the surface is uniformly flat and move through the grits without skipping more than one step. If you use only a hand plane, finish with a light smoothing pass and sand only as much as needed for the chosen stain or paint. Clear finishes show scratches and cross-grain marks, while opaque paint hides minor surface variation but still reveals deep dips in reflected light.
Safety and buying advice
Wear eye protection with either tool. A belt sander needs hearing protection and effective dust extraction; fine dust from hardwoods and old paint can be hazardous. Never sand suspected lead paint without proper testing and containment. Keep the belt sander’s cord and dust hose out of its path, and do not force the machine when the abrasive stops cutting.
If you flatten boards only occasionally and can accept a slower process, the cheaper option is often fine: a basic hand plane, sharpening supplies, a straightedge, and abrasive paper can cost less than a quality belt sander plus extraction. Buy the belt sander when time, reclaimed wood, or heavy material removal is the priority. Buy the plane when accuracy, low dust, and a clean surface are worth the extra setup.
0 Comments