What's inside
- Best picture lights by situation
- How wide should a picture light be?
- Color temperature and color rendering: 2700K versus 3000K
- Brightness and beam spread matter more than wattage
- Battery versus hardwired picture lights
- Choosing lights for a gallery wall
- Installation details that prevent common mistakes
- Durability, maintenance, and ownership costs
- Final buying checklist
- Best picture lights by situation
- How wide should a picture light be?
- Color temperature and color rendering: 2700K versus 3000K
- Brightness and beam spread matter more than wattage
- Battery versus hardwired picture lights
- Choosing lights for a gallery wall
- Installation details that prevent common mistakes
- Durability, maintenance, and ownership costs
- Final buying checklist
As an Amazon Associate I earn from qualifying purchases. This post may contain affiliate links at no extra cost to you.
The best picture lights are chosen by matching the fixture’s illuminated width, color temperature, brightness, and installation method to the artwork—not simply by buying the longest bar that fits the frame.
For most framed art, a warm, dimmable LED picture light with a 2700–3000K color temperature and a beam spread around 90–120 degrees is the safest choice. Choose a battery model when you cannot run wiring or want a temporary arrangement; choose a hardwired or plug-in light for a permanent gallery wall, heavier use, and more predictable brightness.
As an Amazon Associate we earn from qualifying purchases at no extra cost to you.

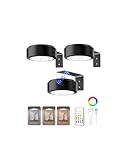


Best picture lights by situation
| Situation | Best choice | Useful target specifications | Why it fits |
|---|---|---|---|
| One small frame or rented home | Short battery LED picture light | 8–12 in. wide, 80–150 lumens, 2700–3000K | No wall wiring; easy to move or remove |
| Medium artwork used every day | Plug-in or hardwired LED bar | 16–24 in. wide, 150–300 lumens, dimmable | More consistent output and less maintenance |
| Large horizontal painting | Long hardwired picture light | 24–36 in. wide, 300–600 lumens, 90–120° beam | Spreads light across the frame with fewer dark edges |
| Multiple frames in a gallery wall | Several narrow lights or recessed directional lighting | One light per major grouping; 2700–3000K, high CRI | Avoids one bright fixture overpowering smaller pieces |
| Valuable or color-sensitive artwork | Low-heat, high-CRI LED fixture | CRI 90+, UV-free LED, dimmer, 2700–3000K | Better color rendering and gentler long-term illumination |
How wide should a picture light be?
Light width is the first practical measurement. A fixture that is too short leaves the sides of the artwork noticeably darker; one that is too long can dominate a narrow frame.
- For artwork up to 18 inches wide, use an 8–12-inch light.
- For 18–30-inch artwork, use a 16–24-inch light.
- For 30–48-inch artwork, use a 24–36-inch light.
- For artwork wider than 48 inches, use two coordinated fixtures or a properly positioned track or recessed system.
A useful rule is to choose a light between one-half and three-quarters of the frame’s width. For example, a 32-inch-wide frame usually suits a 20–24-inch picture light. This is a starting point rather than a law: a wide beam can cover a frame with a shorter bar, while a narrow beam requires more width or multiple fixtures.
Measure the visible artwork and the complete frame separately. A thick frame, deep canvas, or projecting molding may require a longer arm and a larger mounting plate. Check the manufacturer’s stated projection, since the light needs to extend far enough to illuminate the surface without casting a shadow from the frame’s upper lip.
Color temperature and color rendering: 2700K versus 3000K
Color temperature changes the mood and the apparent color of the artwork. A 2700K light produces a soft, warm appearance that suits traditional interiors, oil paintings, wood frames, and rooms already lit with warm lamps. A 3000K light looks cleaner and slightly whiter, making it a good match for contemporary art, white walls, and spaces with neutral LED lighting.
Avoid mixing a 2700K picture light with nearby 3500K or 4000K ceiling lights unless the contrast is intentional. The artwork can appear yellow beside a cool overhead source even when the picture light itself is well chosen.
Look for a color-rendering index of 90 or higher when accurate reds, blues, and skin tones matter. High CRI does not guarantee that every color will look perfect, but it is a useful minimum filter. LED picture lights are generally preferable to older incandescent fixtures because they produce less heat at the artwork and use less electricity. For particularly sensitive works, follow the guidance of a conservator and avoid leaving the light on continuously.
Brightness and beam spread matter more than wattage
Wattage describes energy use, not how much light reaches the painting. Compare lumens, dimming range, and beam spread instead.
- 80–150 lumens: suitable for small frames, dark rooms, or accent lighting.
- 150–300 lumens: a practical range for most medium artwork.
- 300–600 lumens: useful for large frames, dark walls, or rooms with substantial ambient light.
A narrow 30–60-degree beam creates stronger highlights but can leave the frame edges dark and may produce visible glare on glass. A 90–120-degree beam spreads light more evenly and is usually easier to live with on glossy prints or framed photographs. If the artwork has glass, position the fixture so the reflected beam does not point toward the viewer’s normal standing position. A dimmer is valuable because the correct brightness depends on wall color, room lighting, frame depth, and viewing distance.
Battery versus hardwired picture lights
Battery-powered lights
Battery picture lights are the simplest answer when opening a wall is impractical. They install with screws or adhesive hardware, and many include a remote control, timer, or motion sensor. Their weaknesses are predictable: the light may be dimmer than a wired model, battery life varies sharply with brightness and usage, and the fixture can become heavier as battery capacity increases.
As a planning example, suppose a light uses 3 watts and runs for two hours each evening. At roughly 14 watt-hours per week, a small rechargeable unit may need charging every few weeks, while disposable batteries may last several months depending on their capacity and the driver’s efficiency. Treat published runtime as an estimate; maximum brightness, cold temperatures, and aging cells reduce it.
Battery lights work best for rented homes, seasonal displays, small pictures, and walls where a visible cable would be more distracting than occasional charging.
Hardwired and plug-in lights
Hardwired fixtures provide the most reliable brightness and the cleanest appearance. They are the better choice for a permanent installation, a large painting, or a wall that is lit for several hours daily. Installation may require an electrician, especially if the light needs a new junction box or a wall switch.
Plug-in models sit between the two options. They avoid opening the wall but require cable management. A paintable cable raceway can make the installation tidy, although it remains visible on close inspection. For a gallery wall, one plug-in fixture can power several compatible lights only if the system is designed for that arrangement; do not improvise connections between unrelated low-voltage products.
Choosing lights for a gallery wall
A gallery wall should be treated as a composition, not as one oversized picture. One long light centered above the entire arrangement can create a bright middle and weak outer frames. Instead, divide the wall into visual groups.
- Measure the total arrangement, including the outermost frames.
- Identify the largest or most important piece in each group.
- Place a light above each major group, or use several adjustable directional sources.
- Keep the color temperature and brightness consistent across all fixtures.
- Check sightlines from the room’s main seating and walking positions.
For three frames arranged across a 60-inch wall, three 10-inch battery lights may look busy and create uneven pools of light. Two 18–24-inch fixtures, each centered over a pair or grouping of frames, may produce a calmer result. Conversely, three separate paintings with large gaps between them may need individual lights so the empty wall does not become the brightest part of the display.
Installation details that prevent common mistakes
Mount the light high enough that the arm does not obscure the frame, but close enough for the beam to reach the artwork. For a typical frame, the fixture is often mounted 2–6 inches above the top edge, though deep frames may need more clearance. Use a level, locate studs or use appropriately rated anchors, and confirm that the screw length will not damage the frame or wiring.
Before tightening the mount, temporarily hold the fixture in place and check the beam at normal viewing height. Look for glare, shadows from the frame, and bright spots near the top edge. On textured paintings, a slightly broader and less intense beam usually looks more even than a concentrated spotlight.
Durability, maintenance, and ownership costs
The first parts to cause trouble are usually batteries, switches, dimmers, remote controls, and flexible arms—not the LED itself. Choose a fixture with replaceable batteries or a replaceable charging cable when possible. A permanently sealed rechargeable unit may be inexpensive initially but difficult to maintain after its internal cell loses capacity.
Dust the diffuser and reflector with a dry microfiber cloth every few months. Do not spray cleaner onto the fixture, and never wipe the artwork or frame with a damp cloth while the light is energized. Check mounting screws annually, particularly on plasterboard, because vibration from repeated adjustment can loosen them.
For a permanent display, the higher initial cost of a quality hardwired fixture—often roughly $100–$400 for the fixture, before professional installation—can be worthwhile. Basic battery lights commonly fall around $30–$120, while decorative or designer models can cost substantially more. The right choice is the one that delivers even light, correct color, and manageable maintenance for the way the wall is actually used.
Final buying checklist
- Measure the frame, not just the artwork.
- Choose roughly half to three-quarters of the frame width as a starting fixture length.
- Select 2700K for a warm traditional look or 3000K for a cleaner contemporary match.
- Prefer CRI 90 or higher for paintings and photographs where color matters.
- Use 90–120-degree beam spread for even coverage and less glare.
- Choose battery power for flexibility, plug-in for minimal construction, and hardwiring for permanent daily use.
- Use dimming rather than excessive brightness to solve uneven illumination.
- For gallery walls, light visual groups instead of automatically using one bar across the whole arrangement.

0 Comments